- Apparently, DataItem is persistent but doesn't work like database. When you send 2 DataItem objects to a same node via same Uri, the second one will replace the first one instead of update field by field. I thought it would work like update statement of database ;(
- If you send multiple DataItem to wearable while it's out of your handheld's range, the DataApi.DataListener you register on wearable side will only get called ONCE for the last DataItem you sent.
Showing posts with label Android. Show all posts
Showing posts with label Android. Show all posts
10 Jun 2015
Notes on Wearable development

24 Sept 2014
Show unused resources in Android Studio
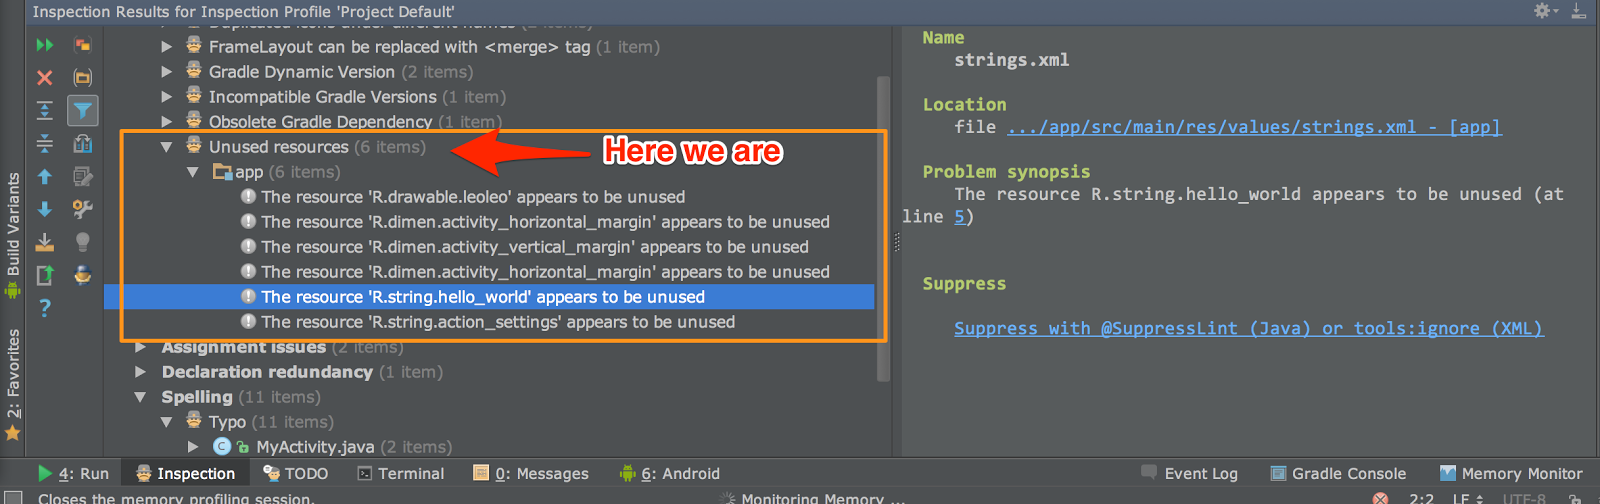
Today when I was reading about how to decrease size of an APK file, I discovered a functionality that I have been looking for in Android Studio, it's how to show unused resources. This functionality becomes extremely helpful when you want to optimize your APK file before release, and I believe the smaller your APK file the more download your app will get.
Oh, just one more note, I'm using Android Studio Beta 0.8.11 (Updated from Canary Channel)
Yeah, that's it.
Happy coding ;)
Enough rambling, this is how you get it:
Analyze -> Inspect code...Then in Inspection windows (View -> Tool Windows -> Inspection), under Android Lint, you will find an entry named "Unused resources", click on it and you would get something like:
Oh, just one more note, I'm using Android Studio Beta 0.8.11 (Updated from Canary Channel)
Yeah, that's it.
Happy coding ;)
10 Jul 2014
ImageView.setImageBitmap and other ImageView's set image methods
Have you ever stumbled in a case that you use ImageView.setImageResource(R.drawable.your_image) and your image is displayed totally fine in all devices, then you want to make your ImageView more dynamic by put your image into a server, then use something (like Volley, UniversalImageLoader...) to load the image as a Bitmap, then use ImageView.setImageBitmap(your_bitmap) to display your image but it's displayed fine in all devices anymore?!
I got myself into that case today, after using ImageView.setImageBitmap(), my image is displayed too big in some devices and too small in some others. It took me an hour debugging and reading the ImaveView's source code and still couldn't figure out why but reminded me about Android's DisplayMetrics.
As we are developing Android and iOS versions parallel, both share the same resources, and I put all Android's image resources into drawable-xhdpi (as you may know, Android's xhdpi and iOS's retina have the same density), so when I use ImageView.setImageResource(), it displays my images pretty well on all current popular devices (exclude tablets), but why not ImageView.setImageBitmap()?!
The reason is ImageView.setImageResource() cares about device's density, but setImageBitmap() doens't seem to, I think it probably uses some default settings. So to fix it, just use Bitmap.setDensity() with an appropriate density from DensityMetrics. For example, in my case, I would use:
That's it ;-)
Happy coding, guys!
I got myself into that case today, after using ImageView.setImageBitmap(), my image is displayed too big in some devices and too small in some others. It took me an hour debugging and reading the ImaveView's source code and still couldn't figure out why but reminded me about Android's DisplayMetrics.
As we are developing Android and iOS versions parallel, both share the same resources, and I put all Android's image resources into drawable-xhdpi (as you may know, Android's xhdpi and iOS's retina have the same density), so when I use ImageView.setImageResource(), it displays my images pretty well on all current popular devices (exclude tablets), but why not ImageView.setImageBitmap()?!
The reason is ImageView.setImageResource() cares about device's density, but setImageBitmap() doens't seem to, I think it probably uses some default settings. So to fix it, just use Bitmap.setDensity() with an appropriate density from DensityMetrics. For example, in my case, I would use:
bitmap.setDensity(DisplayMetrics.DENSITY_XHIGH);
That's it ;-)
Happy coding, guys!
8 Jun 2014
9GAG - TV's iPhone app like animation on Android
I'm always a huge fan of http://9gag.com, and recently, they released a version of http://9gag.tv for iPhone with very cool animation. When I saw it, it aroused my curious, so I tried to implement it on Android, and here is what I've got :)
You can grab the source code here: https://github.com/mrleolink/9GAGTVAnimation
A side note: This is just a simple implementation I have made in a few hours, I tried to reuse views for cards bust just in a very simple way. I believe that this sample can be improved to hook with a custom Adapter to create a completed widget for Android, but I don't have enough of time at the moment, so if any of you have time to implement it, feel free to give me a pull request.
You can grab the source code here: https://github.com/mrleolink/9GAGTVAnimation
A side note: This is just a simple implementation I have made in a few hours, I tried to reuse views for cards bust just in a very simple way. I believe that this sample can be improved to hook with a custom Adapter to create a completed widget for Android, but I don't have enough of time at the moment, so if any of you have time to implement it, feel free to give me a pull request.
20 May 2014
Android Canvas's clipping functions doensn't work?
I was working on an Android's custom view to show a volume bar with an overlay gradient, it looks somewhat like to this:

My approach was calculate small volume bars's RectF then use Canvas's clipRect to clip the canvas, then draw the gradient and gray part on it. Everything worked well with Nexus 5 and Galaxy S2 LTE, but not with a NTTdocomo Android phone (all of them were 4.0 up).
At first I thought the divider between volume bars was too small but after double checked, it wasn't the reason. Then it took me 2 hours for many checks (Android API Samples) and searches, it's only because of something called Hardware Acceleration, as written in the developer page:
So, Hardware Acceleration must be enabled by default on all of my devices, then I tried to turn it off by putting this line into the Activity which contains my custom view:
And it worked!!!
So all the blames should go to the Hardware Acceleration, but why did it still work with Hardware Acceleration ON on two other devices ?!
It's a question that I haven't but need to figure out later!
P/S: The more I work with Android, the more I see this sentence of a random guy on StackOverflow is very true:
Hope this help someone out there to not waste 2 hours at work like I did lol, happy coding guys!
UPDATE: I just found this today (20140728) http://developer.android.com/guide/topics/graphics/hardware-accel.html. There is a table about Unsupported Drawing Operations, so you guys can take a look then enable/disable hardware acceleration to match your needs.
My approach was calculate small volume bars's RectF then use Canvas's clipRect to clip the canvas, then draw the gradient and gray part on it. Everything worked well with Nexus 5 and Galaxy S2 LTE, but not with a NTTdocomo Android phone (all of them were 4.0 up).
At first I thought the divider between volume bars was too small but after double checked, it wasn't the reason. Then it took me 2 hours for many checks (Android API Samples) and searches, it's only because of something called Hardware Acceleration, as written in the developer page:
Hardware acceleration is enabled by default if your Target API level is >=14
So, Hardware Acceleration must be enabled by default on all of my devices, then I tried to turn it off by putting this line into the Activity which contains my custom view:
android:hardwareAccelerated="false"
And it worked!!!
So all the blames should go to the Hardware Acceleration, but why did it still work with Hardware Acceleration ON on two other devices ?!
It's a question that I haven't but need to figure out later!
P/S: The more I work with Android, the more I see this sentence of a random guy on StackOverflow is very true:
Everything is so random with Android!
Hope this help someone out there to not waste 2 hours at work like I did lol, happy coding guys!
UPDATE: I just found this today (20140728) http://developer.android.com/guide/topics/graphics/hardware-accel.html. There is a table about Unsupported Drawing Operations, so you guys can take a look then enable/disable hardware acceleration to match your needs.
14 Mar 2014
Android - LinearGradient comprehension
Today I read about Property Animation, and I got into following snippet somehow.

At first, I couldn't figure out how does LinearGradient really work, especially the part position, why when:
is used, it gives a result like above picture?!
After an hour of trial-and-error, I realized that:
- The first number 0 means where the first Color.BLACK begins
- The second one, 0.5f means 50% of the width (0 to 150), so the Color.WHITE begins at where X = 75 (relatively with the TextView). And the TextView turns from Color.BLACK(X=0) to Color.WHITE(X=75) within the part from X=0 to X=75
- Same things happen between the second one and the third one, TextView turns from Color.WHITE(X=75) to Color.BLACK(X=150) within the part from X=75 to X=150
Well, that's how the gradient is rendered as a great above picture, and if you work some more to integrate LinearGradient with Property Animation, you will get a great effect ;)
TextView tv = (TextView) rootView.findViewById(R.id.textview);
tv.setText("I'm Leo");
tv.setWidth(150);
tv.setBackgroundColor(Color.BLACK);
LinearGradient linearGradient = new LinearGradient(0, 0, 150, 0,
        new int[]{
                Color.BLACK,
                Color.WHITE,
                Color.BLACK
        },
        new float[]{
                0,
                0.5f,
                1
        },
        Shader.TileMode.CLAMP);
tv.getPaint().setShader(linearGradient);
At first, I couldn't figure out how does LinearGradient really work, especially the part position, why when:
new float[]{
        0,
        0.5f,
        1
},
is used, it gives a result like above picture?!
After an hour of trial-and-error, I realized that:
- The first number 0 means where the first Color.BLACK begins
- The second one, 0.5f means 50% of the width (0 to 150), so the Color.WHITE begins at where X = 75 (relatively with the TextView). And the TextView turns from Color.BLACK(X=0) to Color.WHITE(X=75) within the part from X=0 to X=75
- Same things happen between the second one and the third one, TextView turns from Color.WHITE(X=75) to Color.BLACK(X=150) within the part from X=75 to X=150
Well, that's how the gradient is rendered as a great above picture, and if you work some more to integrate LinearGradient with Property Animation, you will get a great effect ;)
20 Feb 2014
Alternative to Intent.FLAG_ACTIVITY_CLEAR_TASK
I want to use Intent.FLAG_ACTIVITY_CLEAR_TASK to start my app from a notification on Android's status bar like it's restarted, but as you may know, Intent.FLAG_ACTIVITY_CLEAR_TASK requires Android API 11, so I found an alternative for it. Basically, just replace:
with
And it works as expected ;)
intent.setFlags(Intent.FLAG_ACTIVITY_CLEAR_TASK);
PendingIntent contentIntent = PendingIntent.getActivity(this, REQUEST_CODE, intent, PendingIntent.FLAG_UPDATE_CURRENT);
with
ComponentName cn = intent.getComponent();
Intent restartIntent = IntentCompat.makeRestartActivityTask(cn);
PendingIntent contentIntent = PendingIntent.getActivity(this, REQUEST_CODE, restartIntent, PendingIntent.FLAG_UPDATE_CURRENT);
And it works as expected ;)
5 Feb 2014
A hack to catch soft keyboard show/hide event on Android
Today at work, I got this problem: catching event when soft keyboard comes up/down (or show/hide) ?!
At first, I thought it would be easy to resolve, but after a while of googling, I realized that there is no official event or listener in Android API for that, but I did find some workarounds like:
http://stackoverflow.com/questions/4312319/howto-capture-the-virtual-keyboard-show-hide-event-in-android
http://stackoverflow.com/questions/3793093/android-edittext-soft-keyboard-show-hide-event
Well, there are some workarounds that were already posted but they are incomplete (some work on 4.0.4 but not 2.3, some don't work all the time), but at least they are still useful, they gave me an idea to make this "complete" workaround (well, at least it works like a charm in my case for now, I tested on both Android 2.3 and 4.0.4), so I would like to share it here, hope it helps someone out there ;)
Usage: just use following LinearLayout overridden class as the main layout(and of course, use "match_parent" for its layout_width and layout_height) of the activity where you want to catch soft keyboard show/hide events, then setOnSoftKeyboardVisibilityChangeListener for your main layout. Finally, you need this line in your <activity> tag (in manifest.xml) where SoftKeyboardHandledLinearLayout is used:
Take a look at following code to get a better idea of how to implement this hack.
At first, I thought it would be easy to resolve, but after a while of googling, I realized that there is no official event or listener in Android API for that, but I did find some workarounds like:
http://stackoverflow.com/questions/4312319/howto-capture-the-virtual-keyboard-show-hide-event-in-android
http://stackoverflow.com/questions/3793093/android-edittext-soft-keyboard-show-hide-event
Well, there are some workarounds that were already posted but they are incomplete (some work on 4.0.4 but not 2.3, some don't work all the time), but at least they are still useful, they gave me an idea to make this "complete" workaround (well, at least it works like a charm in my case for now, I tested on both Android 2.3 and 4.0.4), so I would like to share it here, hope it helps someone out there ;)
Usage: just use following LinearLayout overridden class as the main layout(and of course, use "match_parent" for its layout_width and layout_height) of the activity where you want to catch soft keyboard show/hide events, then setOnSoftKeyboardVisibilityChangeListener for your main layout. Finally, you need this line in your <activity> tag (in manifest.xml) where SoftKeyboardHandledLinearLayout is used:
android:windowSoftInputMode="adjustResize"
Take a look at following code to get a better idea of how to implement this hack.
19 Jan 2014
WRAP_CONTENT doesn't work with ViewPager?!
Lately, I have been working on an Android project, and when I was making a tutorial activity for it, I got into a problem with ViewPager.
I wanted to use ViewPager and ViewPagerIndicator to show content of the tutorial activity, the ViewPager had a rounded corner background, and each page of it contains an ImageView which is a part of the tutorial. And the problem is although I set layout_width for the ViewPager as wrap_content but it always acts like match_parent?!
After googling for a while, I saw some guys got into the same problem, for example: http://stackoverflow.com/questions/8394681/android-i-am-unable-to-have-viewpager-wrap-content. They proposed some solutions but none of them matches my need, but this anwser gave me an idea.
Because the rounded corner background and all image on pages of the ViewPager have the same size, and as the answer says, it's possible to set a fixed size for the ViewPager, so the solution for my case is just set size of the ViewPager as size of the rounded corner background.
Check out following gist to get a clearer idea about it.
I wanted to use ViewPager and ViewPagerIndicator to show content of the tutorial activity, the ViewPager had a rounded corner background, and each page of it contains an ImageView which is a part of the tutorial. And the problem is although I set layout_width for the ViewPager as wrap_content but it always acts like match_parent?!
After googling for a while, I saw some guys got into the same problem, for example: http://stackoverflow.com/questions/8394681/android-i-am-unable-to-have-viewpager-wrap-content. They proposed some solutions but none of them matches my need, but this anwser gave me an idea.
Because the rounded corner background and all image on pages of the ViewPager have the same size, and as the answer says, it's possible to set a fixed size for the ViewPager, so the solution for my case is just set size of the ViewPager as size of the rounded corner background.
Check out following gist to get a clearer idea about it.
26 Nov 2013
Create a flexible link to open Google Play or your own App from web browser in Android
Today I learnt a completely new thing as the title says it all, so I want to note it here for later uses.
So how to do?
In manifest.xml:
And your link should look like:
The last thing is catching parameters in your com.your.package.ActivityName. In onCreate of the Activity:
That's all, bye xD!
P/S: Oh yeah, I just found this one too: https://developers.google.com/chrome/mobile/docs/intents, check it out!
So how to do?
In manifest.xml:
        <activity
            android:label="@string/activity_label"
            android:name="com.your.package.ActivityName">
            <intent-filter>
                 <data
                      android:host="your-domain-or-whatever.com"
                      android:scheme="your-own-scheme" />
                 <action android:name="android.intent.action.VIEW" />
                 <category android:name="android.intent.category.BROWSABLE" />
                 <category android:name="android.intent.category.DEFAULT" />
            </intent-filter>
        </activity>
And your link should look like:
<a href="intent://your-domain-or-whatever.com/?param1=value1&param2=value2#Intent;scheme=your-own-scheme;package=com.your.app.package;end">OPEN APP OR GOOGLE PLAY</a>
The last thing is catching parameters in your com.your.package.ActivityName. In onCreate of the Activity:
 @Override
 protected void onCreate(Bundle savedInstanceState) {
  super.onCreate(savedInstanceState);
  setContentView(R.layout.your_activity_layout);
  Uri mUri = getIntent().getData();
  String value1 = mUri.getQueryParameter("param1");
  String value2 = mUri.getQueryParameter("param2");
 }
That's all, bye xD!
P/S: Oh yeah, I just found this one too: https://developers.google.com/chrome/mobile/docs/intents, check it out!
28 Feb 2013
Create simple infinite carousel in Android with ViewPager
At first I thought it's easy, someone must have implemented it already, but after searching for it on Google, I got no luck, nobody has done and shared it on the Net, so I decided to make it myself.
I read some posts like:
So I implemented it as you can see in below video:
For more information, you guys can get the source code here: https://github.com/mrleolink/SimpleInfiniteCarousel. I tried to comment as much as possible in source code, so I hope you understand my idea.
I read some posts like:
So I implemented it as you can see in below video:
The main idea is:
- Use ViewPager as the main view with pages are Fragment, then use ViewPager.setPageMargin(int) to set margin as a negative number, so the next and previous pages of the selected page will be showed up.
- Override the layout which is the root view of Fragments to create scale animation.
- Make a little hack in FragmentPagerAdapter so we can fling infinitely to both directions of the ViewPager.
By the way, I don't think it's the best solution to implement the carousel pattern, so if you have any idea or there's something you don't understand about what I code, just drop me a line :)
20 Nov 2012
Use adb wifi without rooting for Android phones
Well, if your phone is rooted already, it's very easy to use adb without USB cables. Just go to Google Play then search for "adb wifi", you'll see several apps which can help you with your rooted phone.
But if for some reasons, you don't want or mustn't root your phone (because of the warranty or the phone is not yours...), and you hate debugging your app with the cable plugged in your phone, well, there's still a workaround for you (but it still requires to use the USB cable once or twice)
Steps:
Okay, now you can plug out your USB cable and throw it away (just kidding, you'll might need it in case you restart your phone or you pull out the battery...). Now you have to find your phone IP, go to Setting -> Wi-Fi -> Select the Wi-Fi network your phone is using, then you'll see the IP address. Now on your computer, you have to connect adb to your phone, for example, IP address of my phone is 192.168.0.101, I'll do it by this command:
Then you'll see message "connected to 192.168.0.101:5555", now your phone is connected to adb wirelessly. If you want to use adb over USB again, connect your phone to your computer then type in cmd or Terminal:
That's all, good luck!
But if for some reasons, you don't want or mustn't root your phone (because of the warranty or the phone is not yours...), and you hate debugging your app with the cable plugged in your phone, well, there's still a workaround for you (but it still requires to use the USB cable once or twice)
Steps:
- Connect your Android phone with your computer by the USB cable, and make sure you have adb and required drivers for you phone installed on your computer. Then type (this command tells adb daemon to listen over Wifi - port 5555):
adb tcpip 5555
adb connect 192.168.0.101:5555
adb usb
That's all, good luck!
6 Jun 2012
Subscribe to:
Posts (Atom)